Last Updated on February 1, 2023
Whether you have already jumped onto the NFT bandwagon or you’re just doing the research before dipping your toe in the water, one of the most important things you are going to need to know is how to transfer an NFT correctly (and safely). After all, this is the crypto world, and it can be rather unforgiving at the best of times.
With NFT art selling in the millions these days, it’s essential that you learn how to handle your digital asset with care, just as you would with any other piece of artwork in the real world. On that note, here is a step-by-step guide on how to both send and receive NFTs correctly.
Installing MetaMask
First things first, whether you are sending or receiving an NFT, you’re going to need a handy application called MetaMask. For those of you that are unaware, MetaMask is the world’s leading non-custodial crypto wallet with over 10 million monthly active users. Functioning as both an extension on your browser or a smartphone application, MetaMask allows you to store, manage, and transfer Ether and your ERC-20 tokens.
Upon creating your account, you will be given a chance to create a wallet and add a password that will give you sole access to the account. You will also be given a seed phrase as a backup (pssst. make sure you don’t lose it). Anyway, once you’re up and running with MetaMask, you’re ready to transfer NFTs.
Important note: This is a guide on transferring NFTs stored on the Ethereum blockchain since it currently holds around 97% of all NFTs. While there are other blockchains available (such as Polygon, Solana, Tezos, etc.), ETH is the most popular option, so that is what this instructional guide will cover.
Let’s get into it.
How To Send An NFT (Step By Step)
Here is a quick guide on how to send an NFT between Ethereum compatible wallets. This process will be the same whether you have sold an NFT and you are transferring the token to the buyer or if you are simply sending the NFT to another one of your wallets or a marketplace.
Step 1 – Open your MetaMask mobile application
First things first, if you want to send an NFT using MetaMask, you will need to install the mobile application. For the time being, the browser extension does not support NFT transfers, but this is expected to change in the near future.
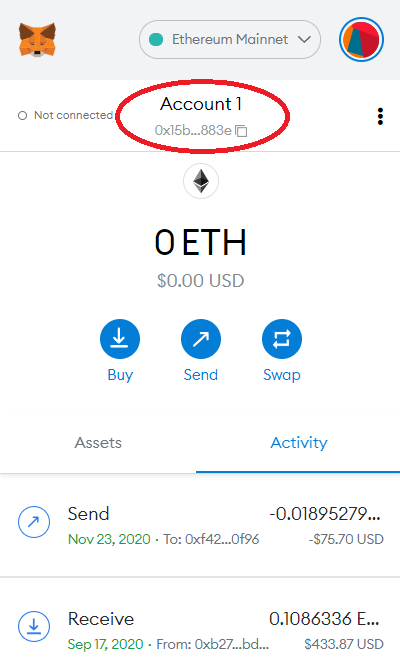
Step 2 – Click on the NFTs tab

Image Source: MetaMask
Tap on the “NFTs” tab to see an overview of all the NFT you own. Select the one you wish to transfer and proceed to the next step
Step 3 – Enter the recipient’s address
Now for the important part. Here you will be prompted for the recipient’s address, which they should have already provided you with. An Ethereum address is a 42-character hexadecimal address, which can look a little confusing for those unfamiliar with them.
However, all you have to do is simply copy and paste the address into the box. Make sure you double (maybe even triple) check the address to make sure they match because once you send the NFT, there is no going back. Once you’re ready, hit ‘Next’ and follow the standard transaction prompts
Step 4 – Pay the transaction (gas) fee
Now it’s time to pay the gas fee. For now, you need to choose between “Slow,” “Average,” and “Fast.” The quicker the option you select, the higher the fees will be. More on that later.
For more info about gas fees when using MetaMask, check out their handy user guide that breaks down the basics.
Step 5- Verify the transaction
Finally, all that’s left for you to do now is to verify the transaction on the blockchain. One of the best ways to do that is through the website Etherscan. Simply enter the transaction ID into the search bar on Etherscan, or click on “View On Etherscan” directly on MetaMask to view the status of the transfer. As soon as you see the word “Success” on the transaction page, your transfer is complete.
How To Receive An NFT (Step By Step)
When you buy an NFT, the digital asset will typically be sent directly to your wallet via the marketplace. However, if this isn’t the case, the seller will need to send it to you manually. Here’s how that works:
Step 1 – Give the sender your ETH wallet address
Go to your MetaMask, copy your address, and provide it to the sender. Ensure there are no errors and that your address is 100% correct.
Step 2 – Have the sender send the NFT to your public address
Once you’re happy that you have provided the center with the correct address, give them the green light and tell them to make the transfer. Once they have sent it, ask them to provide you with the transaction ID (TXID).
Step 3 – Confirm the transaction on Etherscan
Using the TXID, look up the transaction on Etherscan. You should see evidence of the transaction right away on the blockchain. Once the TX is confirmed, you are officially the new owner of the NFT.
Step 4 – Add the token to your wallet
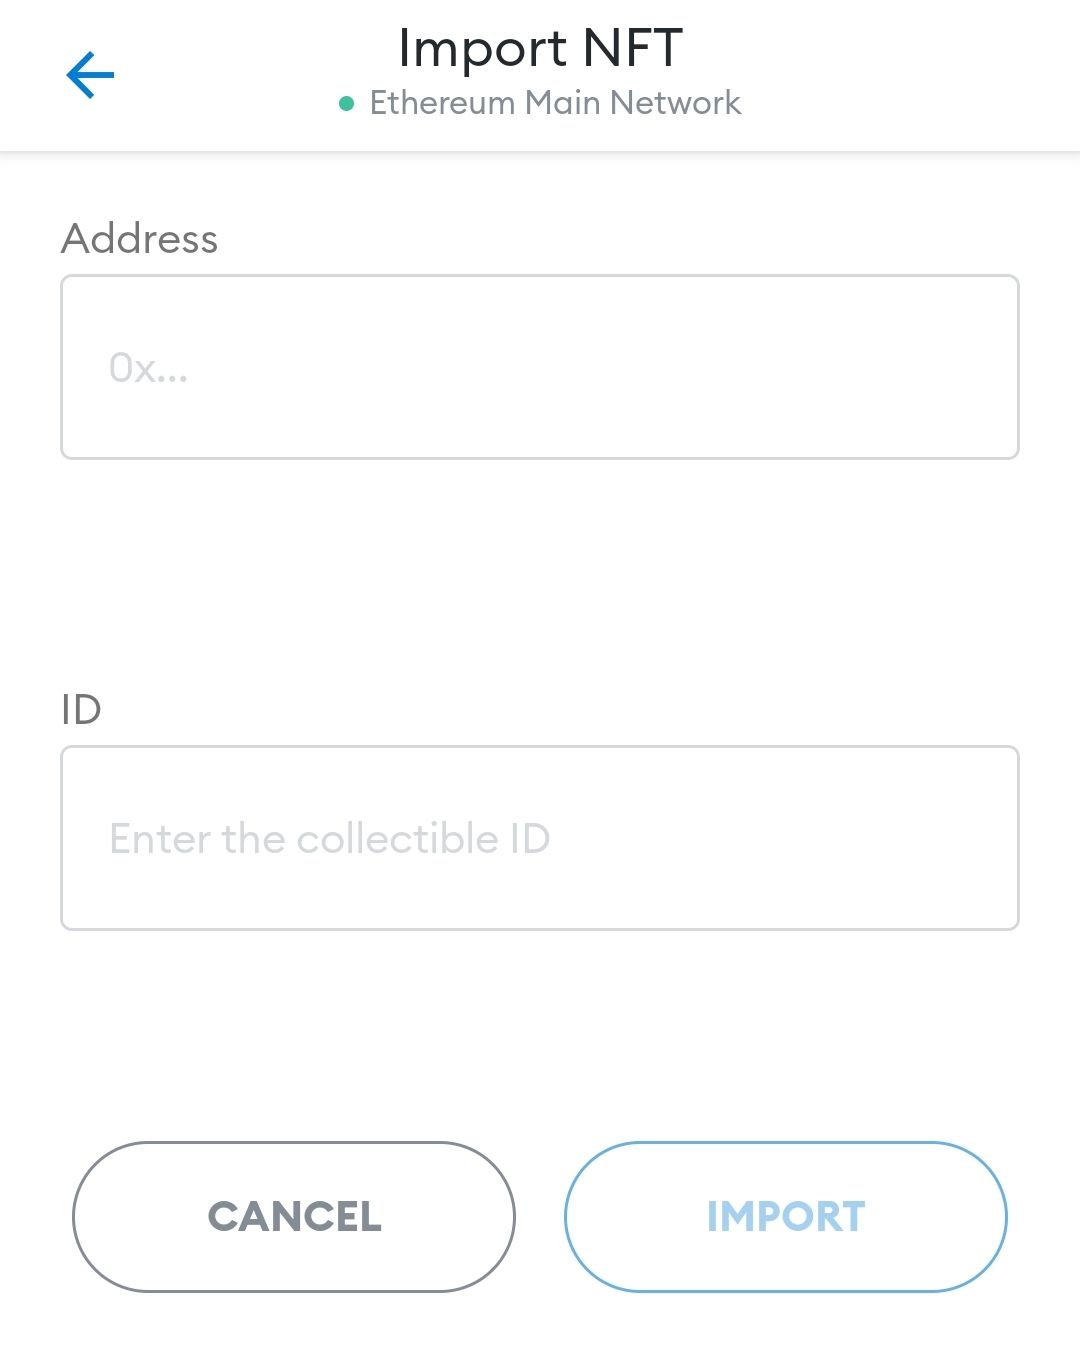
Sometimes the NFT won’t show up in your wallet automatically. If that’s happened to you, don’t worry. All you need to do is add the NFT manually directly on the MetaMask application. Simply click on the NFTs tab once more and select “Import NFT.” You will then be asked to enter the token address and the “collectible ID,” both of which should be readily available to you.
The Cost of Transferring An NFT
As mentioned, whenever you perform a transaction on the Ethereum blockchain, you have to pay something called “gas.” Gas essentially functions as a network fee paid to miners to compensate them for the energy expenditure of mining new ETH tokens.
Unfortunately, the gas fees for transferring an NFT vary dramatically depending on how clogged the network is. The busier it is, the more costly it will be to send an NFT. During periods, you can expect to send an NFT for around $1-20. However, prices can get very high, very fast when it’s busy.
It’s not unheard of for gas prices for a transfer to cost over $200, which is a little eye-watering, to say the least. With this in mind, if you want to save money on gas fees, then try and avoid transferring during peak hours.
How To Keep Your NFT Safe When Transferring
Here are some quick tips on how to keep your NFT and your wallet safe when transferring to other people.
- Use cold storage such as a Ledger or Trezor
- Always verify who you are sending the NFT
- Double-check the address when sending and receiving
- Beware of phishing scams (fake websites and sellers)
- Always confirm the currency when sending/receiving (ETH in this case)
- Never give away your seed phrase or password to your MetaMask account
Finally, if you have sold an NFT to a buyer, never send the token to their address until you have received the funds first. Above all, keep your wits about yourself when directly dealing with sellers/buyers. In general, it’s best to stick to the NFT marketplaces as they offer an extra layer of protection, but if you must go it alone, remember to follow the steps in this article and keep in mind our safety tips.
FAQ
Why transfer an NFT?
There are several reasons to transfer an NFT, including selling it to another user, giving it as a gift, or simply moving it to a different wallet for safekeeping.
How do I transfer an NFT?
The steps typically involve selecting the NFT in your sending wallet, entering the receiving wallet's address, and confirming the transfer. Make sure to read our guide for more information.
Is there a cost to transfer an NFT?
Yes, there is usually a small transaction fee to transfer an NFT, paid in the form of cryptocurrency such as Ethereum. The fee is used to cover the cost of processing the transaction on the blockchain network.
How long does it take to transfer an NFT?
The time it takes to transfer an NFT can vary, but it typically takes a few minutes to a few hours for the transfer to be confirmed and completed.
Can I cancel an NFT transfer?
Once an NFT transfer is initiated, it cannot be cancelled. It is important to double-check the receiving wallet's address before initiating the transfer to avoid sending it to the wrong wallet.